• Skip to primary navigation
  • Skip to main content
  • Skip to primary sidebar
  • Home
  • About/Hire Me
    • About Me
    • Hire Me
    • Contact
    • Family
    • Faith
    • FAQ
    • My Running Story
    • Recipes
  • Disney
  • Fitness
    • runDisney Information Page
    • Fitness
    • Races
  • Parenting
  • Travel

Through Heather's Looking Glass

  • Disney
  • Fitness
  • Travel
  • family
  • About Me

How to Recover a Nursery Glider (the easy way)

September 2, 2014 | baby, pregnancy, tips

This post is about how to recover a nursery glider.

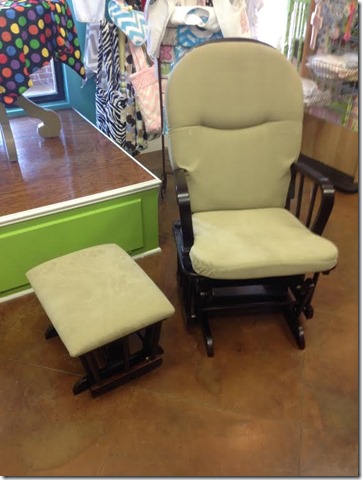
Ever since we moved into our house almost a month ago and painted baby M’s nursery, I have been piecing together in my brain items we needed to complete the space. One item that has always been on this list was a glider/rocker and ottoman. The problem with this is that they range in price (for a decent one) from about $250-$450. Already having to spend so much money to get ready for baby, this thought did not make me happy, so I had been putting off the purchase. Then, a couple weeks ago I was browsing a local consignment shop and got a bad cramp in my foot. I immediately was looking for a place to sit down and this glider was right where I was standing.

Related: Get 20% off a single item at Buy Buy Baby

glider


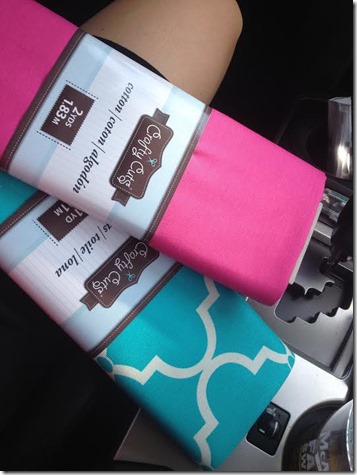
So, I sat, and while wincing in pain from my cramp, began to rock and realized hey, this is pretty comfortable! I looked at the price tag….$89 for the chair AND ottoman! Yes, please! I took a picture and sent it to Bobby, and he agreed it was a good buy, so it came home with me. Now, I have no idea who owned said glider before me, nor did I want to sit in their baby vomit, so I decided to recover the chair. (Those that know me and my lack of crafty-ness may laugh hysterically now). I started where else, but Pinterest, and found LOTS of cute ideas….but most of them involved a sewing machine, creating armrests, adding batting, among other things well above my skill level. I quickly changed my search to “how to recover a nursery glider with no sewing” and found a few options such as adding velcro and hot glue, using iron and stick on tape….still a little “eh” on wanting to do something like that for a chair most people will never see. So, I decided to just wing it, and headed to the craft store for some fabric and….something to get it onto the chair, at that point I wasn’t sure what. I came home with two colors of fabric, some VELCRO Brand – Sticky Back Tape and some Uncarded Liquid Stitch, 4-Ounce

…still with no idea how I was going to pull this off and recover a nursery glider.

glider recover 3

Yall, I’m going to give you a warning right now. If you are a crafty person, you may want to stop reading. If the thought of someone not doing something the “right way” makes you want to twitch, you are NOT going to want to read about how I completed this project. I get it, you are very talented in this area and roll your eyes at people like me, and that is fine! I just want to warn you to divert your eyes, or you may end up at my house fixing my chair for me because you just can’t sleep at night.

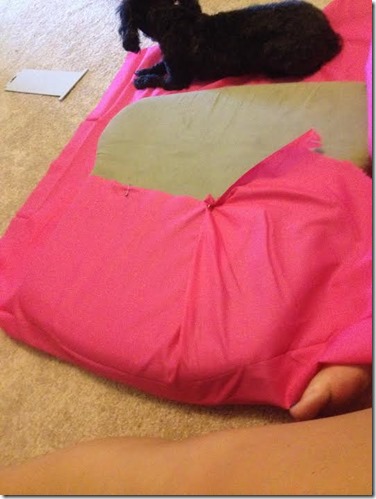
I started by laying out the fabric and putting the back and bottom cushion on it to see how much I had. Well, I thought I was going to have enough to completely cover the front and back, but I misjudged. Never fear, who is going to see the back anyway? I would make do.

glider recover 4

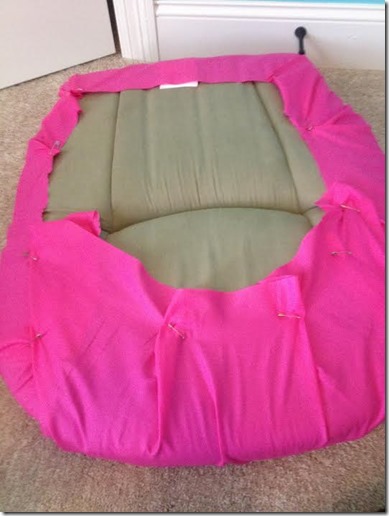
Apparently Sassy thought it would be a nice place for a nap. I began folding the corners over and started using safety pins to pull it tight, and figured I would come back later with the velcro or SOMETHING to make it look more professional (haha). Below is what the back cushion looked like after I safety pinned it all the way around.

glider recover 5

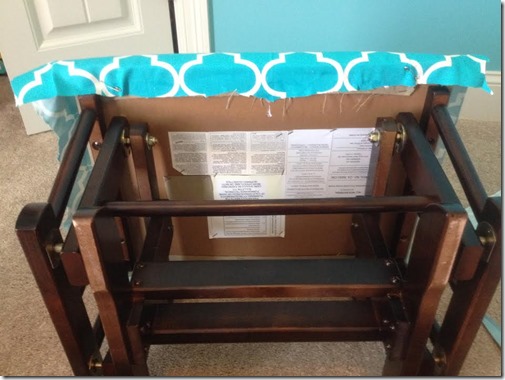
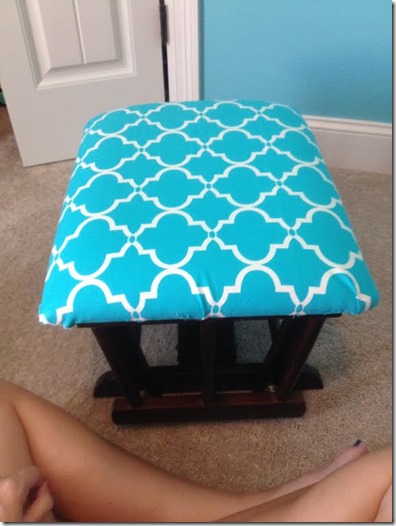
I did the same with the bottom cushion, then decided to come back to this part later and then moved on to the ottoman. This was a little bit trickier because the fabric was stapled down all around the bottom. I thought about doing the same, but don’t have a staple gun. I did however have a new tube of liquid stitch, so I thought I would give it a go. I basically wrapped the edges like a present and ran a line of the glue all the way around, and for added support used safety pins on the four corners as well.

glider recover 6

It looks a total mess underneath but I think from the top you can’t tell and it came out nice!

glider recover

When I finished that part, I decided to put the cushions on the chair and place the ottoman “just to see how it looked”. Well….my safety-pinned cushions didn’t look half bad! Does it look awesome? Absolutely not, but for its purposes and my skill set, it looked ok by me. I decided to just leave the safety pins in the cushions and not do anything else to it. That way, if I ever wanted to take the fabric off or change it, it would be fairly simple.

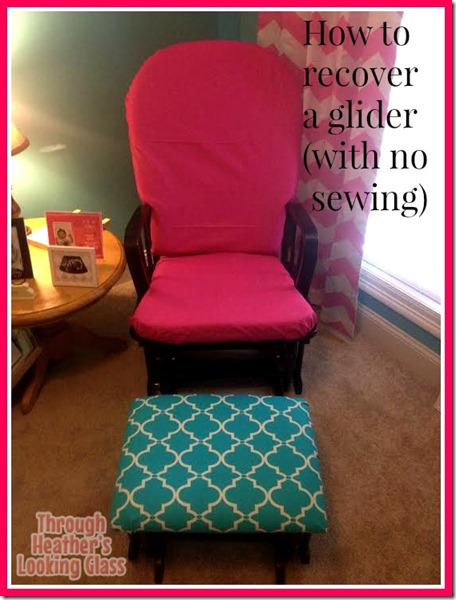
So…I give you, my safety-pinned glider and liquid stitch ottoman!

recover a nursery glider

So for anyone who is like me, who wants to recover a nursery glider but has no idea how to do it in a simple, non-sewing way, remember there is hope! It may not be the prettiest or hold up the longest, but I think it looks better than it did before, and I don’t think baby M will mind it one bit.

Related: Free shipping on rugs for your nursery (or any room!) from Rugs USA

QOTD: are you crafty? Have you ever tried to “wing” an art project

Disclosure: Post may contain affiliate links

Like this:

Like Loading...

Sign up for my newsletter

Reader Interactions

Comments

  1. Jen says

    September 2, 2014 at 3:36 am

    You did such a great job! As a fellow non-crafty person, I’m super impressed!

  2. CARLA says

    September 2, 2014 at 6:29 am

    We tried this when we our daughter was tiny.
    It did NOT look as nice as yours!!!

    • Heather says

      September 4, 2014 at 6:44 am

      it was a lot harder than I anticipated!

  3. Mindy @ Road Runner Girl says

    September 2, 2014 at 6:40 am

    It looks awesome!!!! I am so not crafty! I find the idea and then I hand it over to my crafty mother in law or sister in law to do for me! 😉

  4. Lindsay @ The Lean Green Bean says

    September 2, 2014 at 6:49 am

    love it! way to be resourceful. we’ve been thinking about recovering ours but have been too lazy. i might tackle the footstool at least for a fun pop of color!

    • Heather says

      September 4, 2014 at 6:43 am

      The lazy is exactly why it was done this way haha

  5. Jen says

    September 2, 2014 at 6:56 am

    I love this! I’ve been researching how to do the exact same thing to our glider. I know how to sew but not super well so I might have to try your methods instead! On a side note, we’re doing the same color scheme for our girl on the way!

    • Heather says

      September 4, 2014 at 6:42 am

      I think maybe if I wasn’t so far along in my pregnancy I would have had a little more patience or gotten help from my mom who can sew bbbuuttt…at this point I jsut didn’t care!

  6. Lesley says

    September 2, 2014 at 6:45 am

    It looks great! I’m not crafty one bit and may not even have attempted something like this.

    • Heather says

      September 4, 2014 at 6:44 am

      if you saw how ugly the fabric was close up originally you may have haha

  7. Erin @ Her Heartland Soul says

    September 2, 2014 at 8:42 am

    I am not craft AT ALL. I wish I was!

  8. Lauren @ Lauren's Glass Slipper says

    September 2, 2014 at 9:15 am

    That looks awesome!! Love the colors!

  9. Nicole Glass says

    September 2, 2014 at 8:19 am

    We got a very similar chair from a shop near our house and I ended up buying a new pad online (it ties on) and little extra fabric and husband added more padding and covered the ottoman. I have zero craftiness skills so I am super lucky to have him. He painted and did everything for the baby’s room!

    • Heather says

      September 4, 2014 at 6:42 am

      my husband is sadly even less crafty than me!

  10. Ashley says

    September 3, 2014 at 10:22 pm

    Haha I love it! We used a staple gun to redo that dining set I had on my Facebook, seriously simple may not looks amazing crafter quality but it still looks awesome! I think it is super awesome, and love your fabric choices!

    • Heather says

      September 4, 2014 at 6:29 am

      thanks!

  11. Carrie says

    February 21, 2015 at 3:27 pm

    I love this and figure it’s exactly how I’ll do mine as well! Question…after sitting in it over and over, have you found it popped any of your liquid stitches? I keep picturing throwing myself into the chair and ripping the entire back down with my weight lol

    • Heather says

      February 22, 2015 at 1:23 am

      I only did liquid stitch on the ottoman, I used safety pins on the chair cushions 😉

  12. Alisa says

    August 23, 2015 at 7:27 pm

    Can you tell me how the pin-job held up over time? As you sat on it time after time, month after month, how did it look? Thanks!

    • Heather says

      August 23, 2015 at 7:29 pm

      Held up just fine! I will be honest though and say we don’t use the rocker much anymore though bc baby girl doesn’t care to be rocked!

  13. Krystal says

    February 4, 2016 at 4:02 pm

    Freaking genius!

    • Heather says

      February 8, 2016 at 4:23 pm

      thanks!

  14. Elizabeth says

    January 11, 2017 at 7:01 pm

    You are my, “I have no clue what I’m doing” inspiration for my glider revamp tonight. Fabric and staples in hand. Non crafty fingers crossed.

    • Heather says

      January 11, 2017 at 7:05 pm

      You can do it! No one will see the staples!

Trackbacks

  1. runningwithsass says:
    September 2, 2014 at 1:31 am

    How to Recover a Nursery Glider (the easy way)

    Ever since we moved into our house almost a month ago and painted baby M’s nursery, I have been piecing

  2. Pregnancy Update: Week 36 | Through Heather's Looking Glass says:
    September 3, 2014 at 1:50 am

    […] you see yesterday’s post on recovering a glider? It has a nursery sneak peek in […]

  3. Baby M's Nursery Tour | Through Heather's Looking Glass says:
    September 9, 2014 at 1:28 am

    […] glider and ottoman you may have already seen from my sad attempt at a DIY project. The round table was a hand me down […]

Primary Sidebar

I am Heather Montgomery, a 30 something southern girl living in Knoxville, Tennessee with my husband Bobby, 10-year-old daughter Emma Kate, and our goldendoodles Dolly and Luna. I’m just a regular girl who likes to workout, travel, hang with my family, text, and eat chips and queso. Be sure to check out my “about me” page for more info!
Thank you for visiting, and feel free to contact me with questions, (or for PR inquiries or press trip invites) at Support@HeathersLookingGlass.com.

Please, no guest post requests. 🙂

More about me

Privacy Policy

You can also find me here:

  • Facebook
  • Instagram
  • Pinterest
  • RSS
  • Twitter
  • YouTube

Recent Posts

  • Protecting Your Kids’ Eyes In the Digital Age
  • Late Spring Events Gulf Shores and Orange Beach
  • 6 Ways to Make Mother’s Day Special This Year
  • Exciting News: Allegiant Air Launches New Knoxville to Gulf Shores Nonstop Flight
  • 8 Orange Beach and Gulf Shores Activities that are Perfect for a Family Spring Break


Search

How to Start a Blog

How to start a blog
We are a participant in the Amazon Services LLC Associates Program, an affiliate advertising program designed to provide a means for us to earn fees by linking to Amazon.com and affiliated sites.
  • Disney
  • Fitness
  • Travel
  • Family
I mean I got to hug him, scratch his nose like a g I mean I got to hug him, scratch his nose like a good boy, and watch him shake his tail like we’re besties. No regrets. 🐾 

#DisneyParenting #CharacterDiningChaos #PlutoDeservesASpinOff #gardengrill #disneycharacters #disneydining #disneymeme
💪 Amazon Activewear You Need This Summer! ☀️ (ad)

I found the perfect lightweight workout tank + the cutest high-waisted skort — both from @g4free_official on Amazon! 🙌

✔️ Racerback Tank: Silky soft, airy light (only ~3oz!), 4-way stretch, moisture-wicking, and UPF 50+
✔️ Ruffle Skort: Built-in shorts, pockets, tummy control waistband & comes in 15” or 20” lengths!

Whether you’re hitting the gym, walking the dog, playing tennis or just running errands — this set is comfy and flattering. 💕

🛒 Shop them both on Amazon! Save 10% with G4FREE10! 
(Links in bio! ✨)

#amazonfinds #amazonactivewear #workoutoutfit #g4free #fitmomstyle #athleisurestyle #tennisskirt #gymfashion #amazonfashionfinds #activewearreview #g4freeamazon #amazonfashion
🚢 There are some things I never pictured doing 🚢 There are some things I never pictured doing on a cruise, but here we are! 

@virginvoyages is so unique in its offerings, it truly feels like they are listening to what their “sailors” want. (No Nickel and Dime-ing… tips, Wifi, Group Fitness Classes, Essential Bevvies, Dining, and entertainment - always included on these adult by design voyages!) 

Which of these things do you want to do on your next cruise? 

👉🏻Check out the 🔗 in my bio for up to $200 in onboard credit towards your voyage + their best discount of the year: 
75% off the second Sailor + up to $500 in Instant Savings!! 🎉

#virginvoyages #valiantlady #cruisevacation #cruiseshiplife #travelcreator
No time for the gym? Same. 🙋‍♀️ (ad) That No time for the gym? Same. 🙋‍♀️ (ad)
That’s why the Yesoul R1M Plus Rowing Machine is my new go-to for fun, full-body workouts at home — with zero guilt. 💪🏼✨

✅ Foldable & compact for small spaces
✅ Stream YouTube/Netflix etc. or Spotify while you row (hello, multitasking magic)
✅ No mandatory subscription — just mirror your screen & go!
✅ Built for all fitness levels, so you can start where you are

Mamas, this is your moment to prioritize YOU — without sacrificing your schedule (or your living room).

🛒 Grab yours here: https://bit.ly/3SkLjrM (🔗 in bio)
Use code Heather for $100 off across their G1M series bikes, T1M treadmills, R1M rowing machines, and J1M recumbent bikes! 🙌

Check out: @yesoulfitness.official
#funcardio #yesoul #hometraining #fitnessmotivation #herstrength #mothersdayideas
Here is a look behind the scenes of when we travel Here is a look behind the scenes of when we travel for work. There’s a lot going on that you don’t see on my reels. 🤪

Super glamorous, right? 😬

#behindthescenes #contentcreatorlife #contentcreator2025
🔥 The 5-Minute Smashdown is ON! 🔥 No thawing 🔥 The 5-Minute Smashdown is ON! 🔥
No thawing. No smashing. No mess. Just juicy, crispy, caramelized perfection—straight from freezer to bun in 5 minutes flat. (Ad)

These @omahasteaks Smash Burgers are Built for the Grill™, and right now, you can get 16 FREE with your order. Yes… SIXTEEN.

Ready to taste the burger that’s flipping the script on dinner? Making it easier to grill even on those busy nights where you feel overwhelmed? 

👉 Tap the link in my bio to claim your burgers. 

#OmahaSteaks #SmashBurgers #5MinuteSmashdown #BuiltForTheGrill
Just got back from the cutest cabin in Pigeon Forg Just got back from the cutest cabin in Pigeon Forge and had to share a travel hack for all my fellow moms planning summer getaways. 💡(ad)

We booked with @savvy_stay, which means no third-party fees, no fluff — just direct access to professional hosts and more room in the budget for fun. 🙌🏼 

They even have a price comparison tool on their site so you can see what you WOULD be paying if you went with “the other guys.”

Think: mountain views, family memories, and extra savings that actually make a difference. If Gatlinburg or Pigeon Forge is on your list, do yourself a favor and check out Savvy first!

🏔️☀️ #FamilyTravelTips #MomLifeHacks #SummerVacationPlanning #SavvyTravel #PigeonForgeCabin #GatlinburgGetaway #TravelSmarter #staysmarter #savvy #traveltips #saveontravel

Copyright © 2025 · Through Heather's Looking Glass · Theme by Bella Creative Studio

%d